
How To Create an Alternative Email Address for Cold Emails
Updated for 2024
If you send cold emails or are planning to in the future, it’s time to set up a new cold email address on a new domain. If you’re curious about deliverability, check out this post we wrote on the subject.

When you decide to ramp up your volume of cold emails, having an alternative email address and domain is a hedge to help protect the reputation of your primary domain.
Even if you’re not immediately scaling your outbound cold emails using Replyify, there’s no downside to creating an alternative email address. You never know when you may need it.
Like a nice bottle of wine or scotch, a domain (and email address) improve over time as they age. I suggest creating your new email address on a new domain.
Your company likely already has a .co, .net, getcompany.com or some other derivative of your primary domain.
An example alternative domain we maintain at Replyify.com is ColdEmail.io
ColdEmail.io was a parked domain on GoDaddy. Initially, we set the domain to redirect to Replyify.com and an alternative (and better) option to a redirect is to create a landing page for the domain using a site like Unbounce. You can use Unbounce for a lot of fun things like this 7 Day Cold Email Crash Course we built on a subdomain get.replyify.com
Bonus points if your landing page is tailored to the messaging in your cold email campaign that you manage on Replyify.
No engineering degree Required to set up a new email Address
You don't need an engineering degree to set up a new cold email address for Replyify. Click To TweetBut if you’ve never done this before or even if it’s been a while, this post will save you a lot of time clicking around.
Below you’ll find a step by step guide to quickly set up a new email address in Google Workspace that is optimized for cold emailing.
This post follows the path of keeping the domain associated to an existing Gsuite account with a domain purchased on GoDaddy. If you want to keep this really simple, purchase your domain from Google.
(If your domain wasn’t purchased on GoDaddy then you should follow the instructions here.)
Setting up GSuite (GMail) for a domain hosted on GoDaddy
1) Log in to your Google Admin and navigate to the Domains section and click Add/Remove Domains.
2) Click the Add a Domain or Domain Alias button.
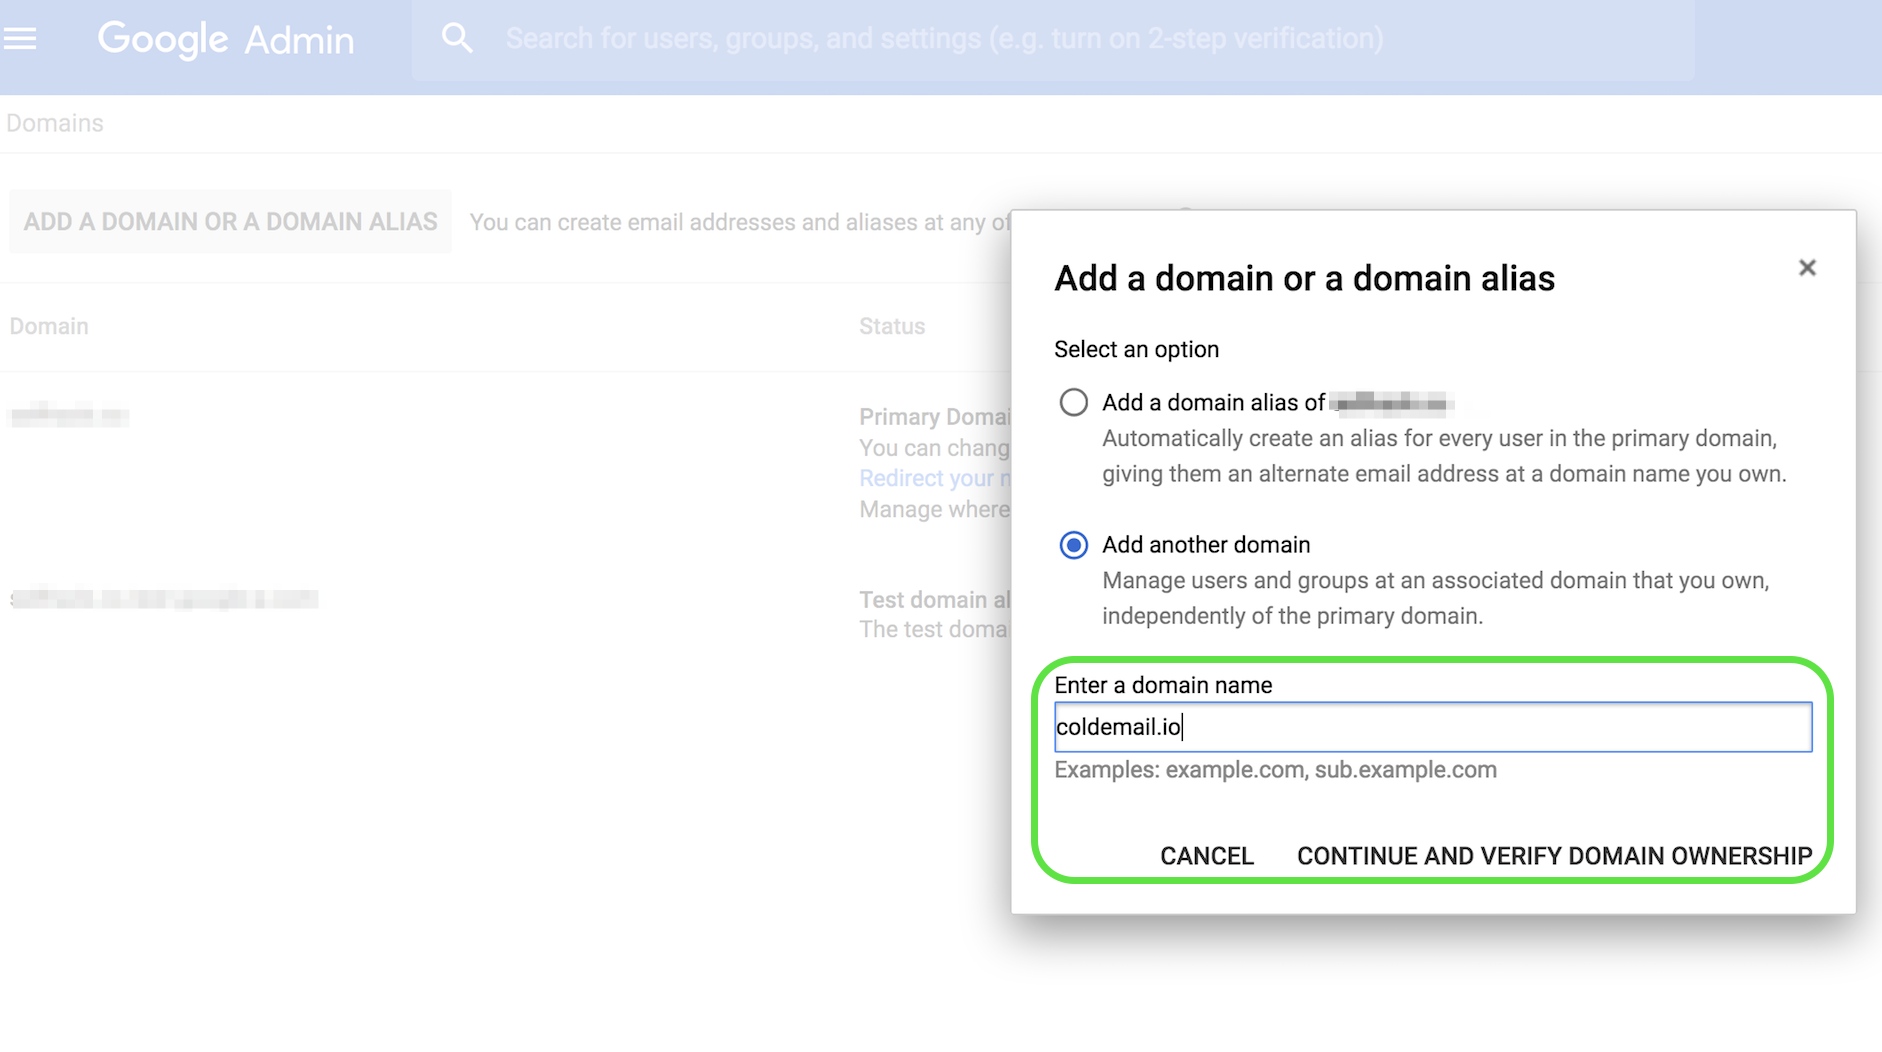
3) Select the option to Add Another Domain and enter your domain name then click the button to ‘Continue and Verify Domain Ownership’
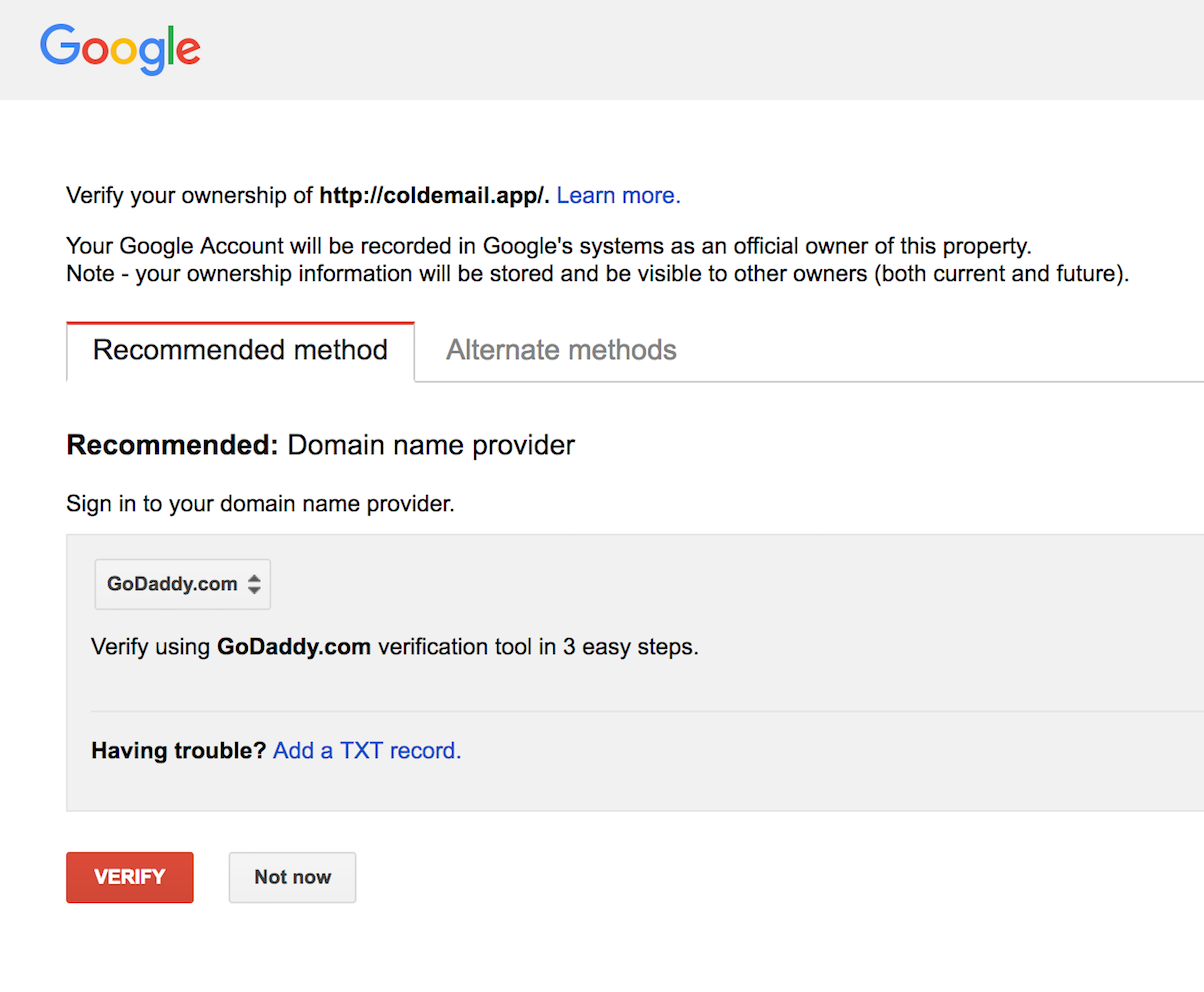
Google should automatically detect that Godaddy is the Registrar for the domain. Click the red ‘Verify’ button. A new window will popup prompting you to log in to GoDaddy. After logging in, you’ll wait about 60 seconds while Google verifies you’re the owner. If this doesn’t work, Google will provide you with alternative methods to verify like adding a TXT record.
4) Once your domain is verified, you’ll be prompted to create a user. Enter the name, email address, phone etc and save.
If you already have billing set up in your GSuite account, the new user you created will automatically start a recurring $5 per month subscription. If you don’t have billing set up, you’ll be prompted to pick a plan. The $5 basic should work just fine.
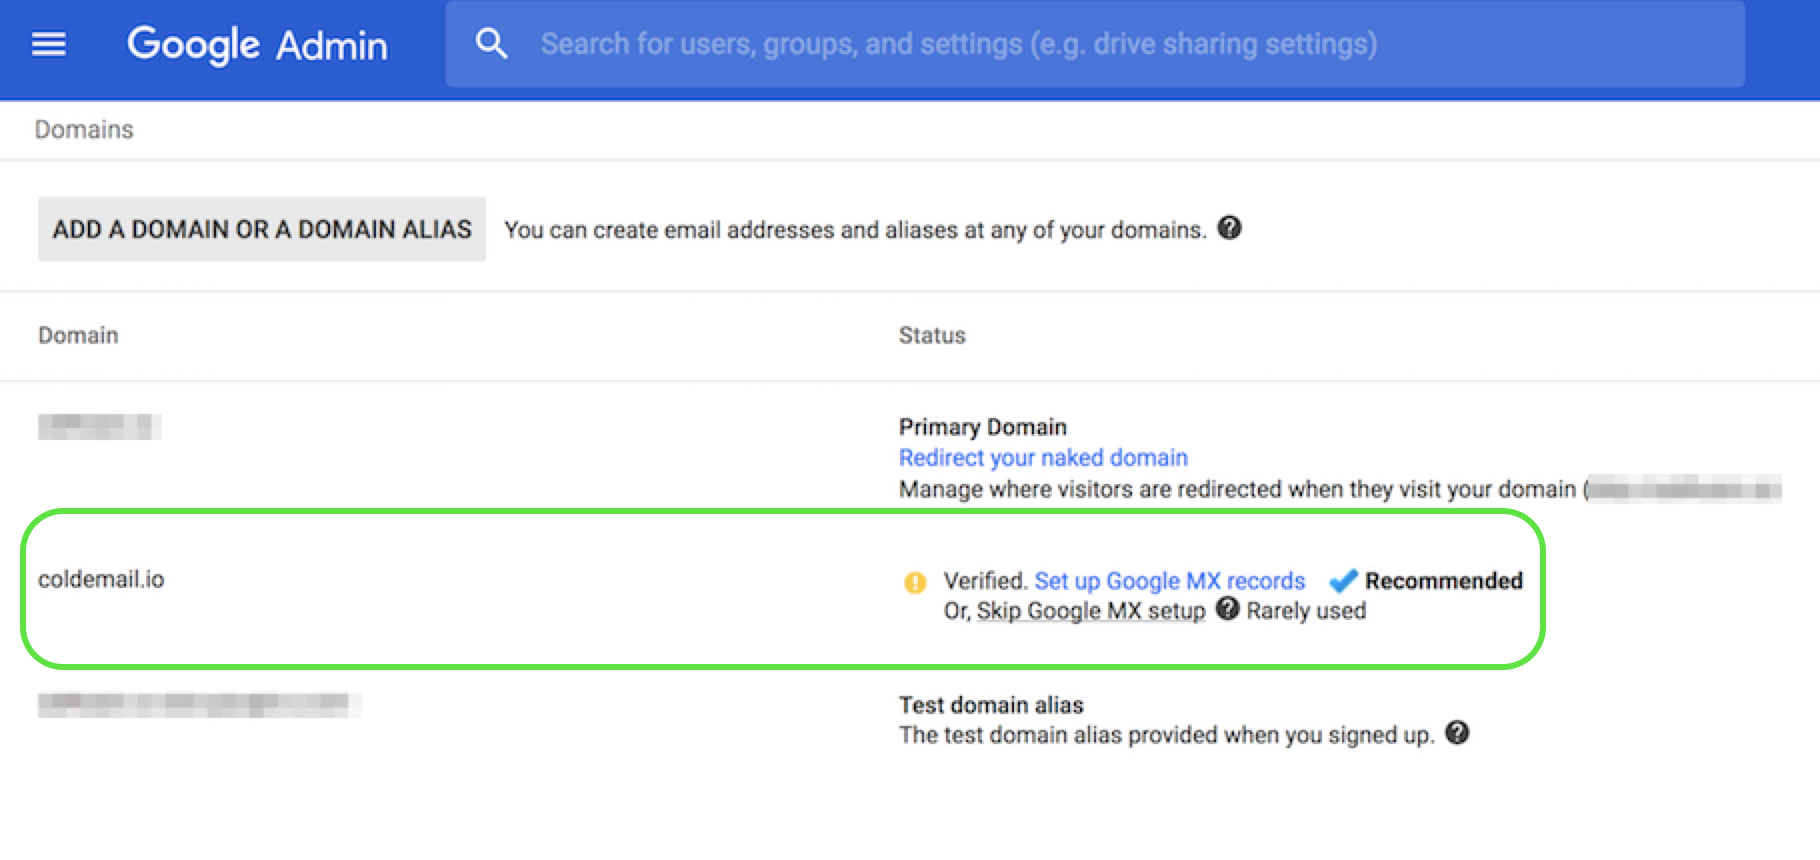
5) Time to set up your MX Records. This is required to allow GSuite (Gmail) to assume the role of Email Service Provider for your newly created email address. On the Google Admin Domains page click ‘Set up Google MX records’ which will link you to this page.
- Log in to your account at http://www.godaddy.com.
- Open the Domains tab, find the domain that you’d like to use with Admin console, and click Manage against the domain, to open the Domain Details page.
- In the Domain Details page, go to the tab DNS ZONE FILE and click on Edit to open the Zone File Editor.
- Use the filter on the right to display only the MX (Mail Exchanger) records, and delete all existing records. Add new MX records by clicking Quick Add or Add under the section MX (Mail Exchanger).
- If you don’t have MX records setup yet, skip this step and move on to #6.
- Add new MX records by clicking Quick Add or Add under the section MX (Mail Exchanger).
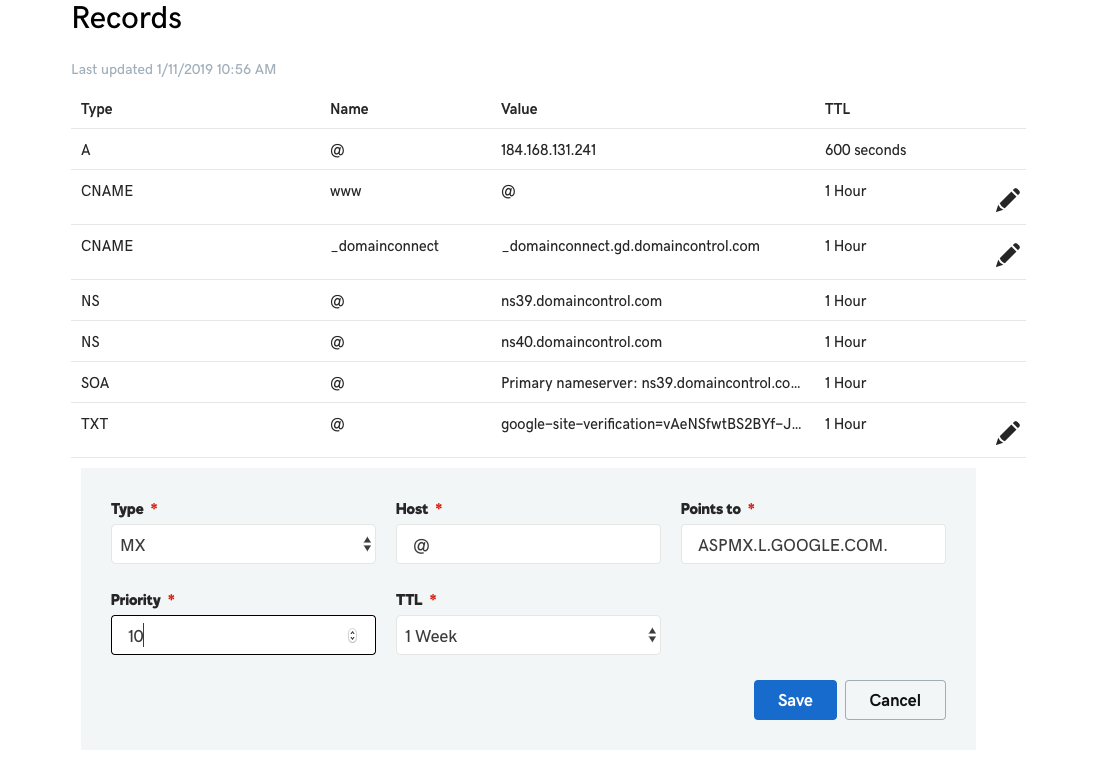
- For each MX Record, enter information according to the data in the table below then click Save Zone File and click OK in the confirmation dialogue:
- For the Select the Priority Value drop-down menu, enter the priority value.
- For Enter a Host Name, leave the default setting to @.
- For Enter Goes To Address enter the Google server name in the table below. Be sure to include the trailing dot at the end of each record.
- For the Select TTL Value drop-down menu, enter 1 Week. This will appear as 604800 seconds within the DNS system.
| PriorityValue | HostName | Goes To Address (Mail Server) | TTL Value |
|---|---|---|---|
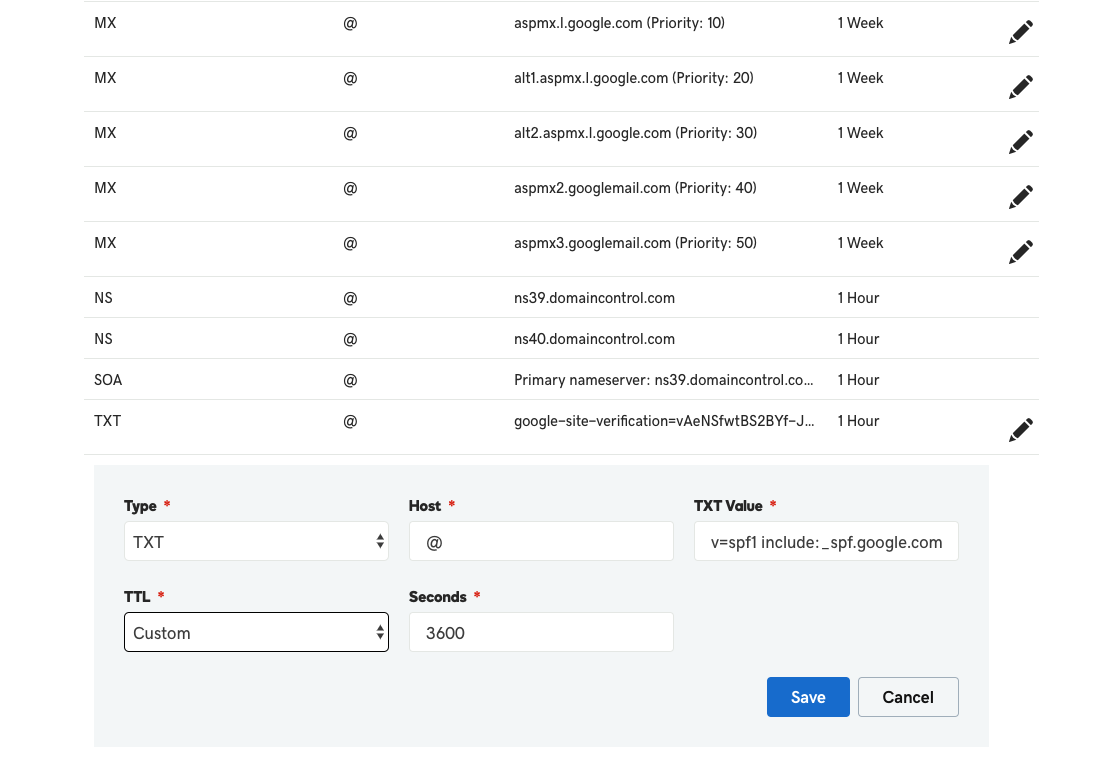
| 10 | @ | ASPMX.L.GOOGLE.COM. | 1 week |
| 20 | @ | ALT1.ASPMX.L.GOOGLE.COM. | 1 week |
| 30 | @ | ALT2.ASPMX.L.GOOGLE.COM. | 1 week |
| 40 | @ | ASPMX2.GOOGLEMAIL.COM. | 1 week |
| 50 | @ | ASPMX3.GOOGLEMAIL.COM. | 1 week |
6) Now it’s time to keep your emails out of the spam folder by setting up an SPF record and DMARC. An SPF record is used to prevent spammers from sending unauthorized emails from your domain. When you send an email to someone, the receiving mail server checks for an SPF record to verify that it’s really you sending the email.
Sending cold emails (or any email for that matter) without an SPF record is like walking up to a Customs Officer when traveling abroad and not having a passport and being turned away or detained (ie – ‘sent to spam folder’).
Sending #coldemail without an SPF record is like trying to get past customs without a passport. Click To TweetThe GSuite MX records we just set up require a Google specific SPF record and detailed instructions can be found here. If your email is hosted somewhere other than Google you may want to refer to the help section of your Email Provider or Domain Host for specific instructions.
Head back to the Godaddy DNS editor (Login > Domains > Manage > DNS) and click Add. If you already have an SPF record because you’re using an outbound gateway (ie – another marketing automation system like Sendgrid) edit the existing record and add include:_spf.google.com ~all . Having more than one SPF record can cause authorization problems. If you don’t have an SPF record already set up, follow the steps below.
7) Create a TXT record with the following values (then save the record):
- Name/Host/Alias: Enter @ or leave it blank. Your other DNS records might indicate which entry is correct.
- Time to Live (TTL): Enter 3600 or leave the default.
- Value/Answer/Destination: Enter v=spf1 include:_spf.google.com ~all
8) Now it’s time to verify your SPF record. This is one of the most important factors in deliverability (read this too).
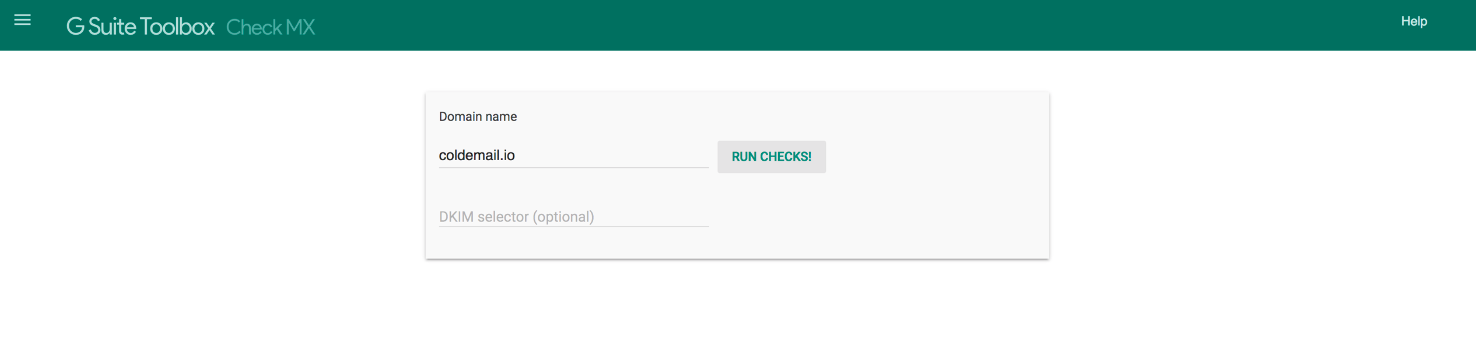
Use the G Suite Toolbox to verify your SPF record.
- Go to https://toolbox.googleapps.com/apps/checkmx/
- Enter your domain name.
- Click Run Checks!
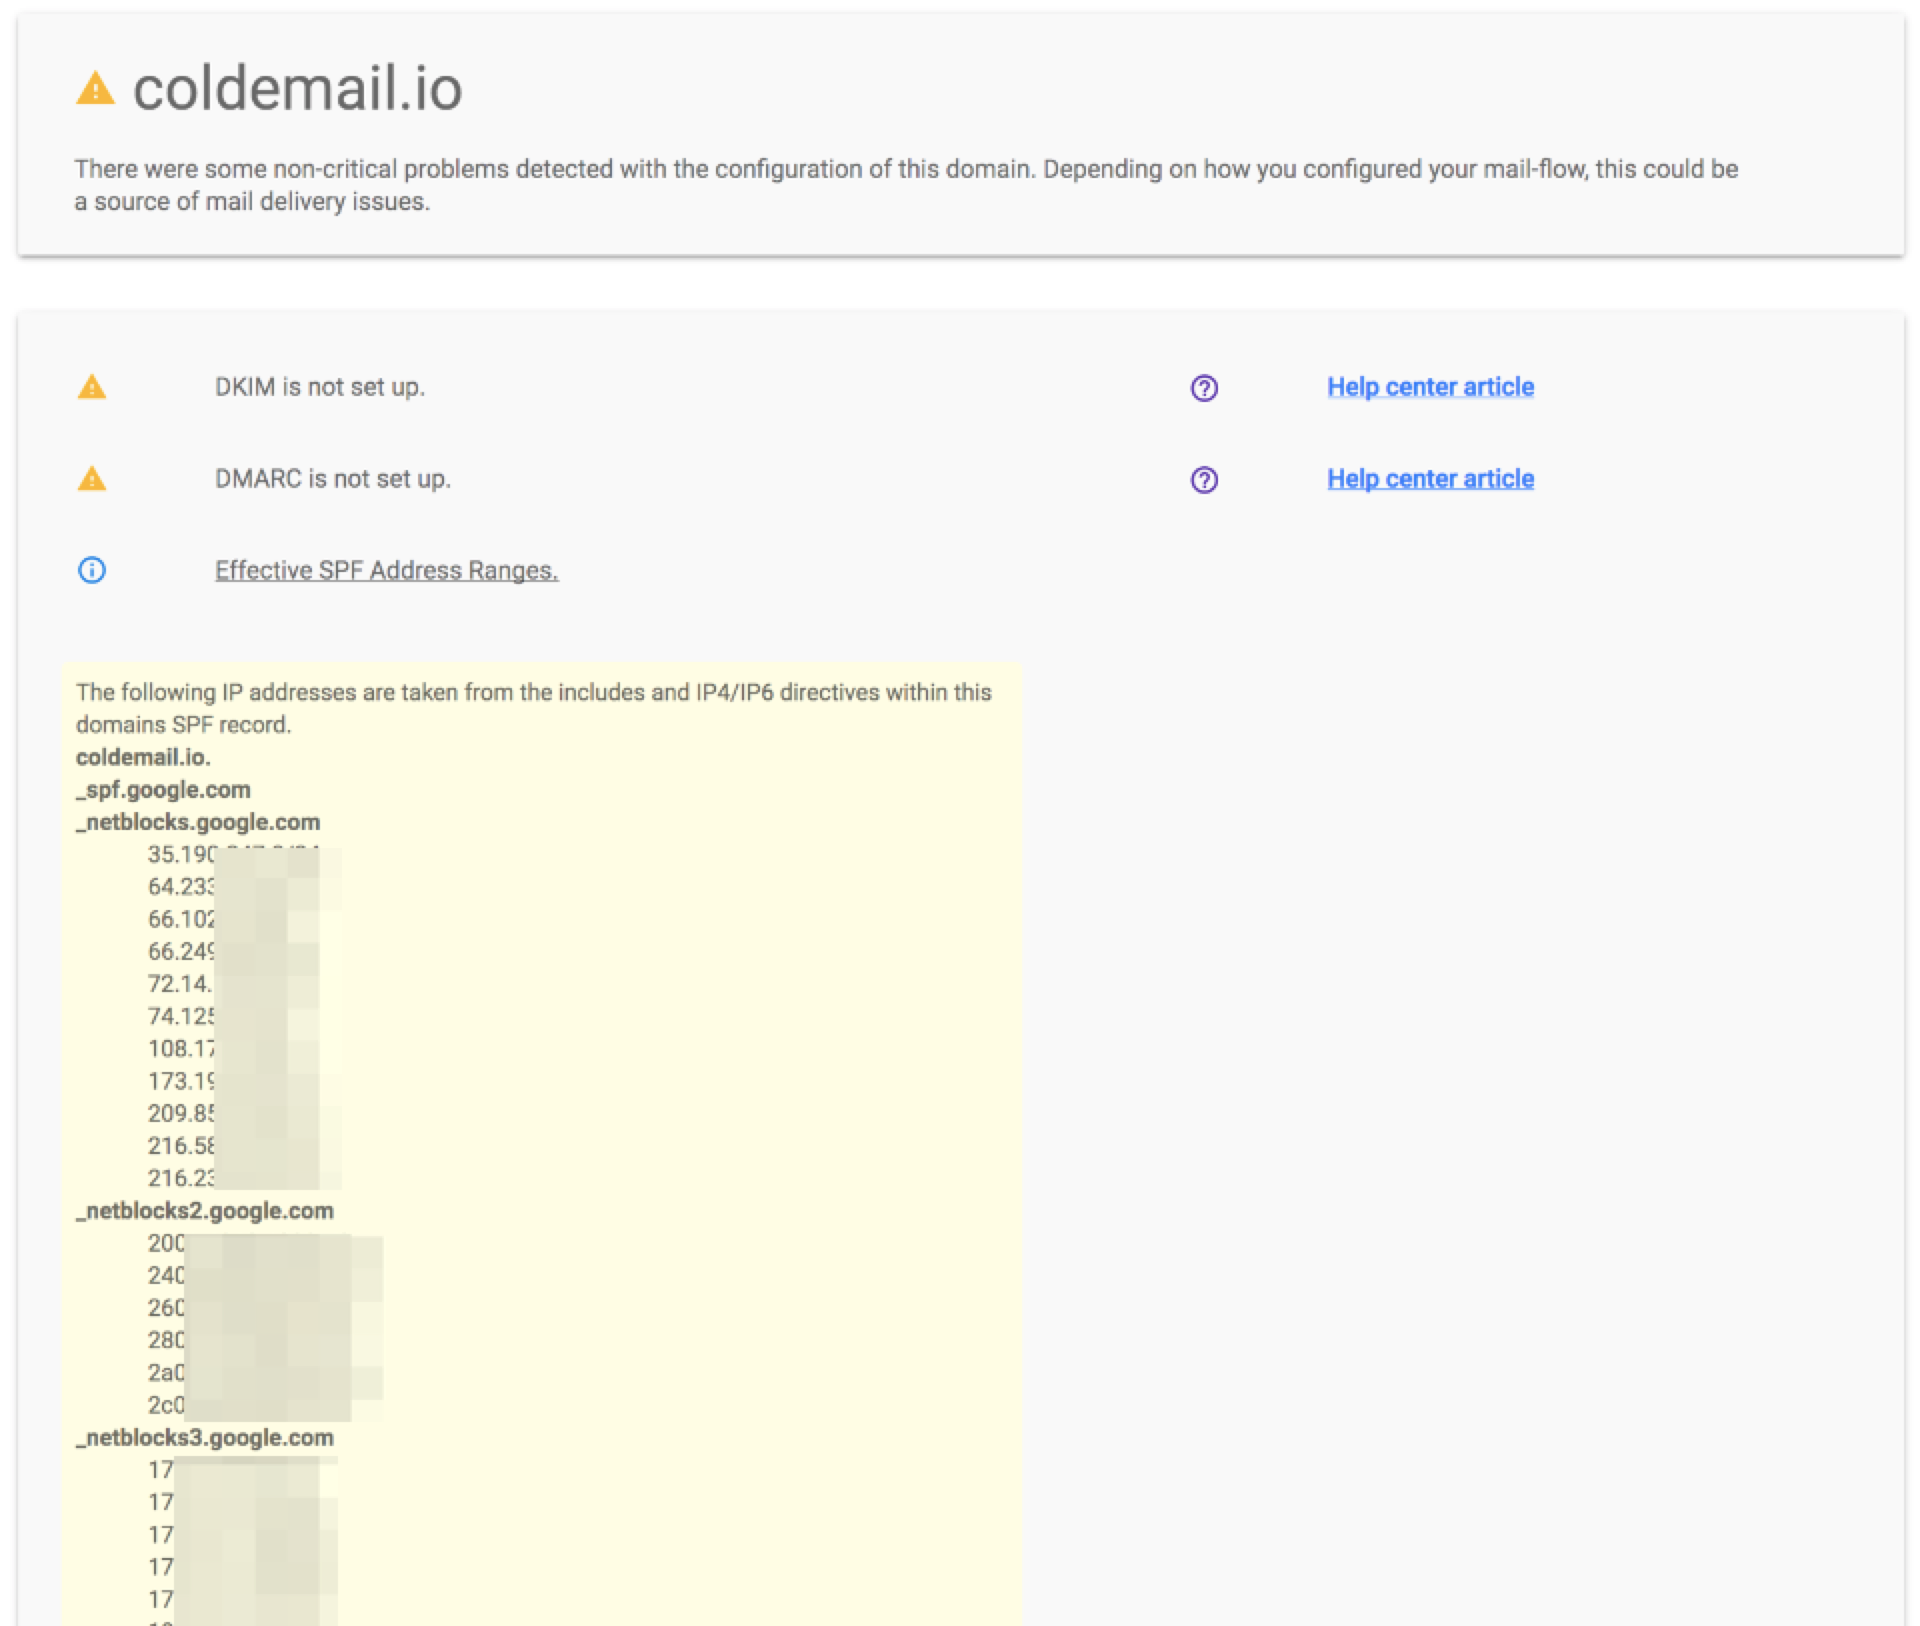
- When the test finishes, click Effective SPF Address Ranges.
- Check the SPF results. The results should include:
- _spf.google.com
- _netblocks.google.com followed by several IP addresses
- _netblocks2.google.com followed by several IP addresses
- _netblocks3.google.com followed by several IP addresses
So far, so good? On the page with the results of the SPF checks, you may notice two warnings for DKIM and DMARC not being set up.
Your new SPF record takes effect within 48 hours, but it can be sooner.
Any time you change your MX records, it can take up to 72 hours for your new records to propagate. The duration varies depending on your hosting company and may be less than 72 hours; however, during this time, mail sent to your domain may bounce. While there’s no way to avoid downtime entirely, there are several steps you can take to avoid bounces during the transition to G Suite email and you can read more about them here.
To avoid future delivery issues with this new email address, I suggest adding your DKIM and DMARC as soon as possible.
DKIM verifies message content is authentic and not changed. SPF specifies domains that can send messages for your organization. DMARC specifies how your domain handles suspicious emails.
About DKIM
Use the DomainKeys Identified Mail (DKIM) standard to help prevent email spoofing on outgoing messages. DKIM adds an encrypted signature to the header of all outgoing messages.
If you don’t turn on email signing with your own domain DKIM key, Gmail signs all outgoing messages with this default DKIM domain key: d=*.gappssmtp.com. Email sent from servers outside of mail.google.com won’t be signed with the default DKIM key.
If you don’t set up DKIM, Gmail uses default DKIM which works just fine even though they suggest you use your own DKIM. Dealer’s choice here and if you want to create your own DKIM, follow the instructions here. https://support.google.com/a/answer/174124?hl=en&ref_topic=2752442
I decided to create a unique DKIM for ColdEmail.io and the first step is to get in to your GSuite Settings for Gmail here. ps – make sure you’re logged in as the Admin for the correct domain when making this change.
Click on the setting to ‘Authenticate Email’ and then Generate your DKIM Key. Head over to your domains DNS.
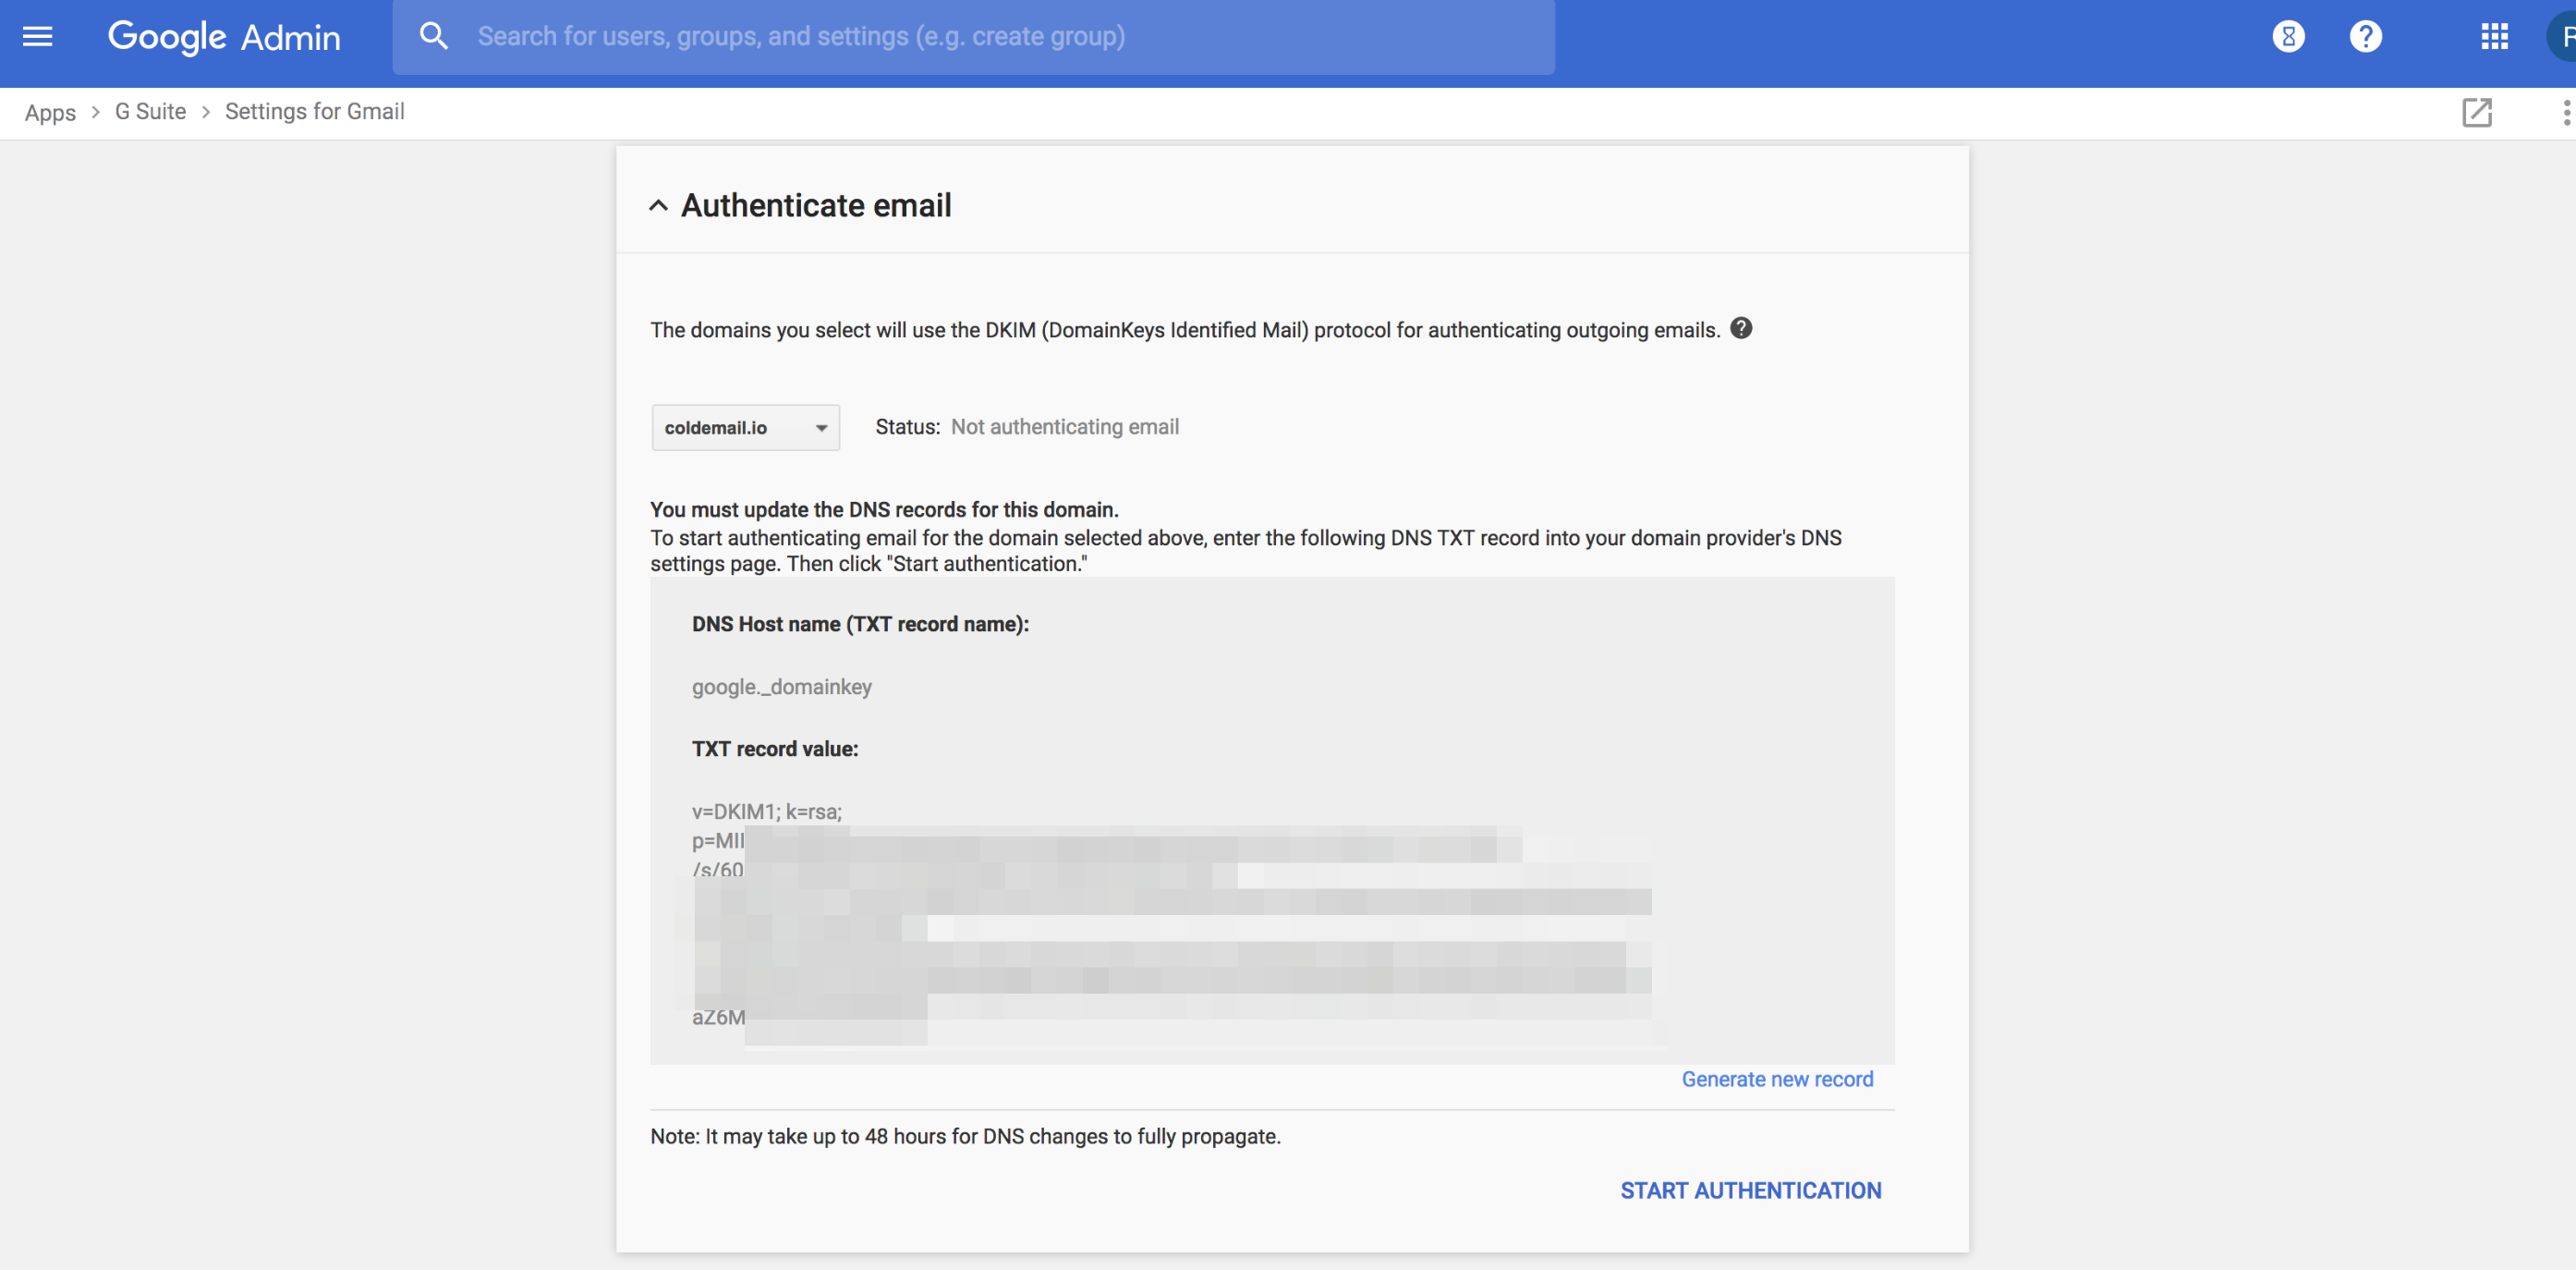
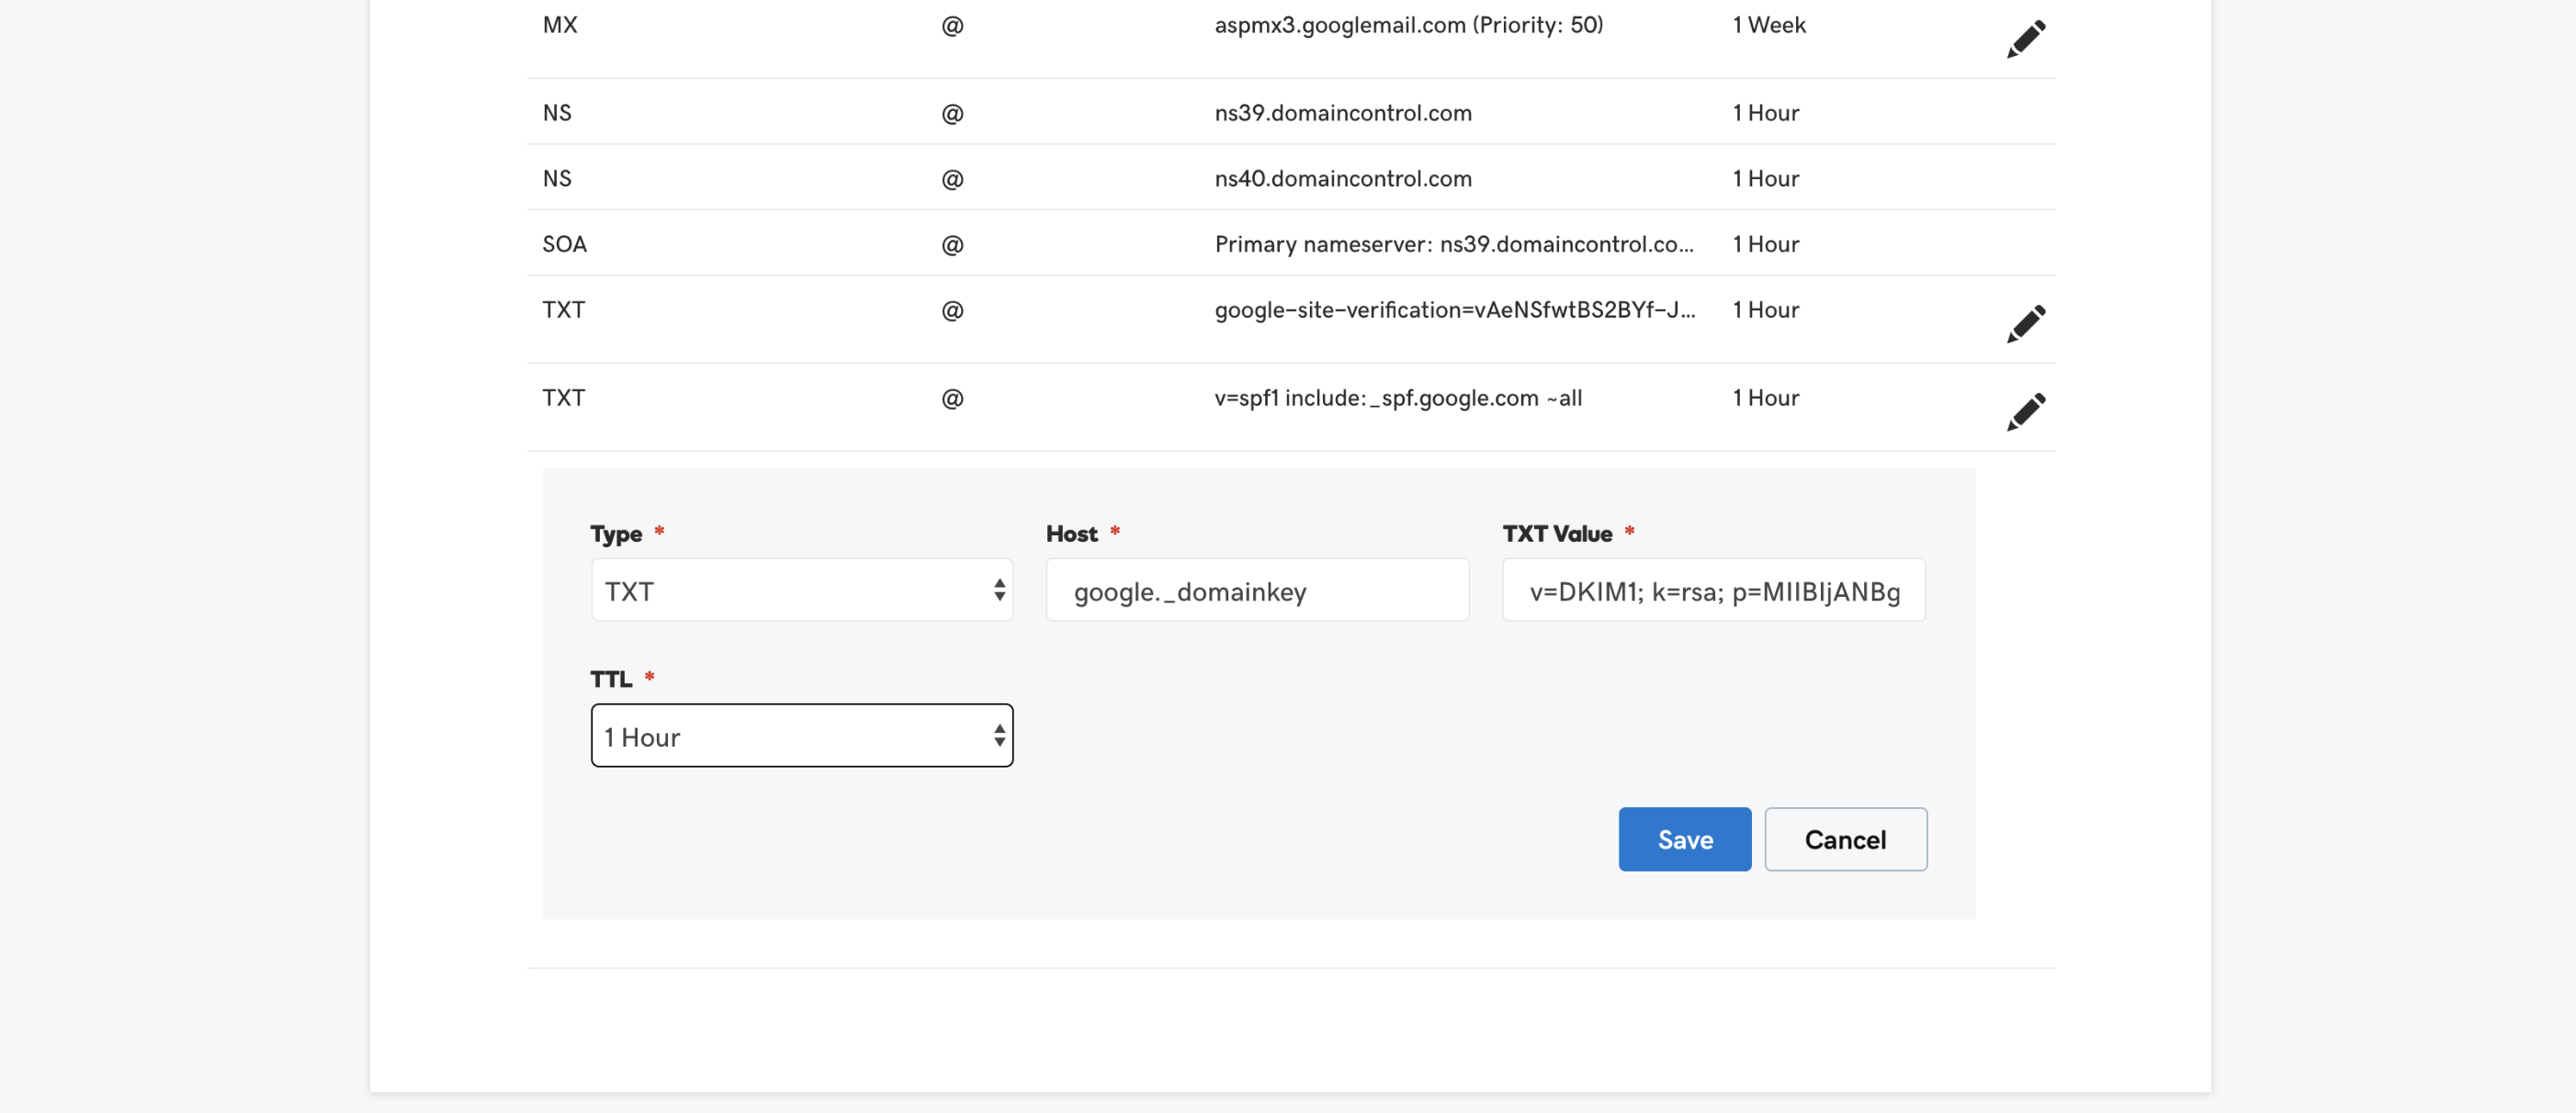
Create/Add a new TXT record to your DNS. ‘google_domainkey’ goes in the ‘host’ and the long string gets pasted into the TXT Value section. TTL can be set to 1 Hour then save. Head back to your Google Admin.
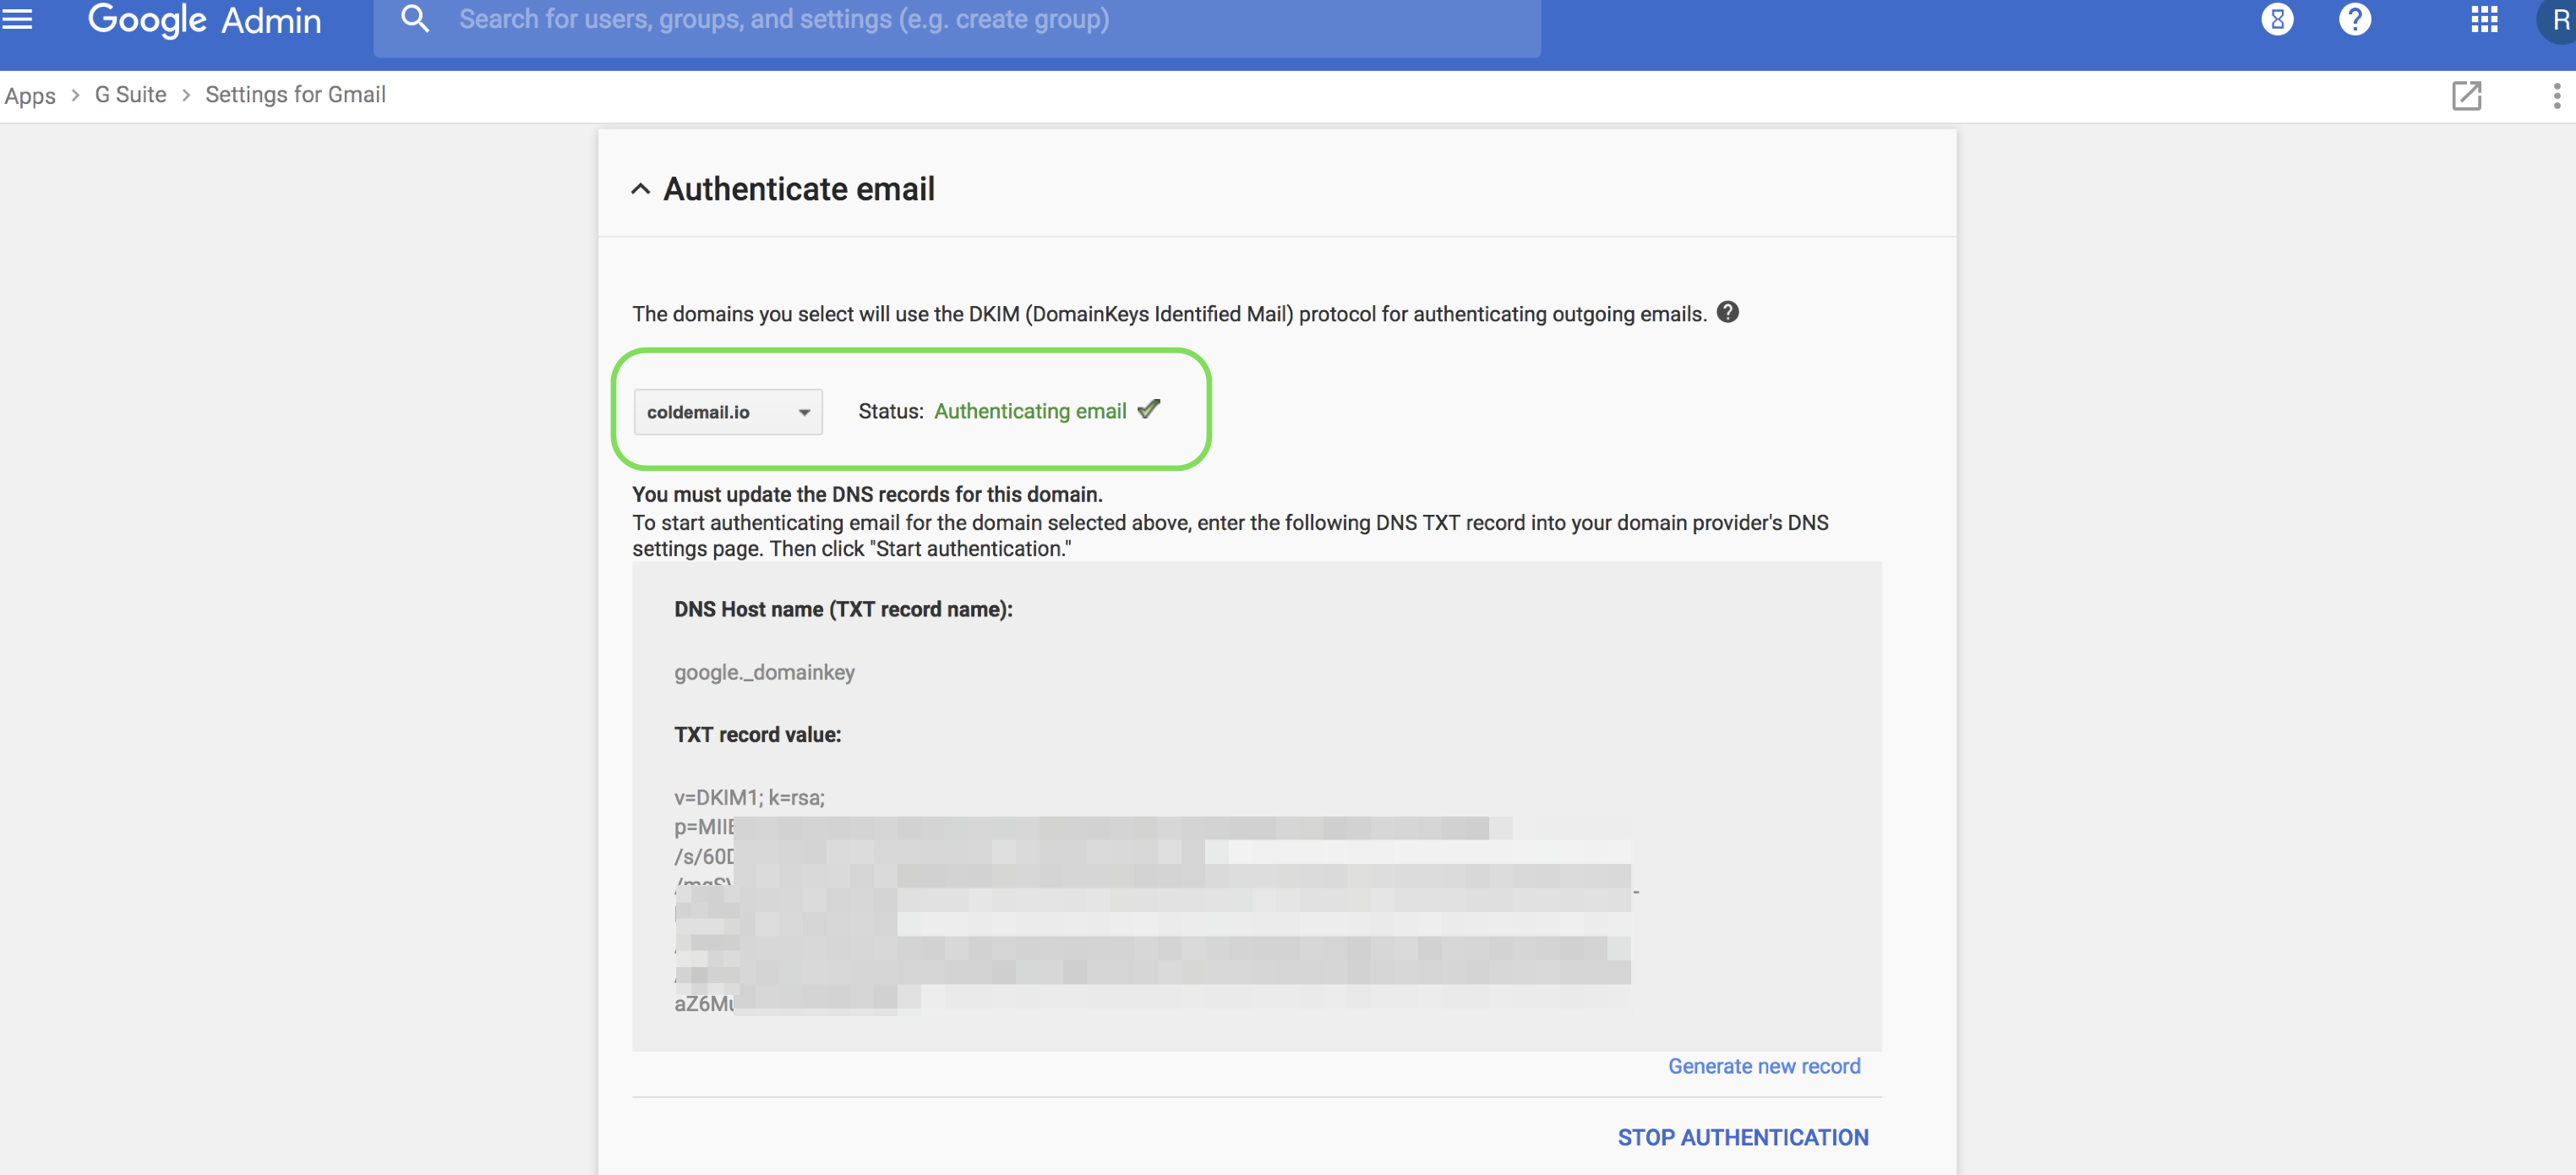
Click the ‘Start Authenticating’ button (bottom right). In a few seconds, you should see a green check mark showing your domain is authenticated and ready to send. If you get a red error message, wait a few minutes and try again. Below is what you’ll see when you’ve successfully implemented thee DKIM.
Optional: Set up DMARC after SPF and DKIM
A message that does not pass SPF or DKIM checks triggers the DMARC policy.
Spammers can forge the “From” address on email messages to make messages appear to come from someone in your domain. Gmail supports Domain-based Message Authentication, Reporting, and Conformance (DMARC) as a way to prevent this type of spam. Google has specific instructions here.
Remember, any time you change your MX records, it can take up to 72 hours for your new records to propagate. So, making this change over the weekend is your safest option if the email address is being used elsewhere. If this is a new email, there’s no time like the present to get started.
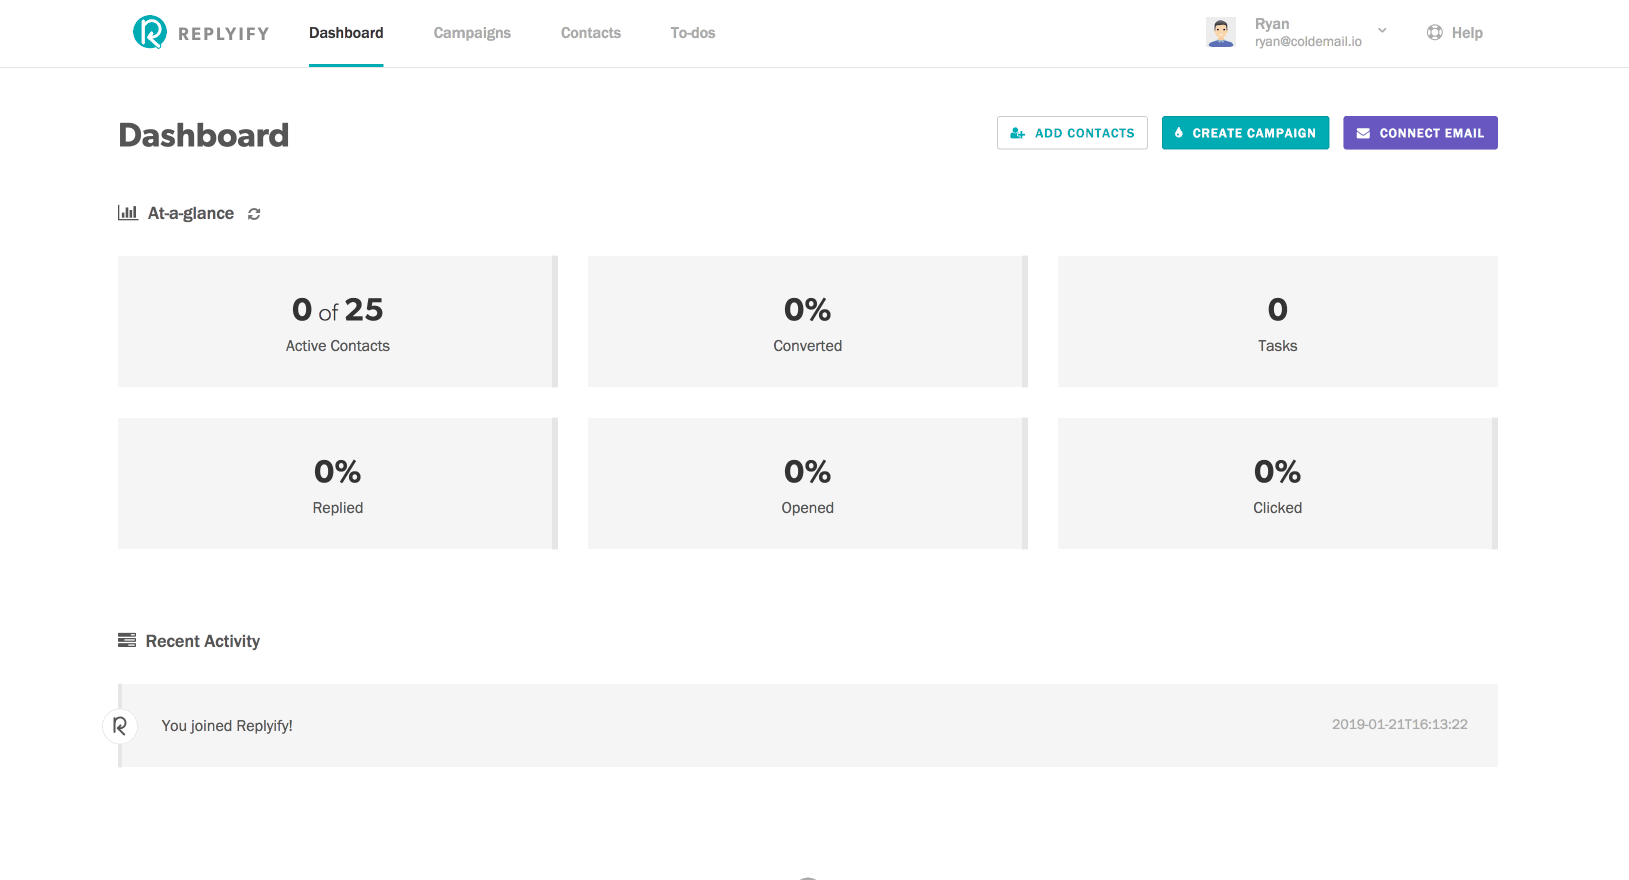
Now it’s time to head back to Replyify and connect your email account.
Next, create your first campaign, add contacts and turn on your ‘warm up account’ feature to ramp up sending emails over the next few weeks.

Day 1: Send 5 Emails (max)
Day 2: Send 10 Emails (max)
Day 3: Send 15 Emails (max)
Day 4: Send 20 Emails (max)
Day 5: Send 25 Emails (max)
Day 6: Send 30 Emails (max)
Day 7: Send 40 Emails (max)
Day 8: Send 50 Emails (max)
Day 9: Send 60 Emails (max)
Day 10: Send 75 Emails (max)
Day 11: Send 90 Emails (max)
Day 12: Send 100 Emails (max)
Day 13: Send 125 Emails (max)
Day 14: Send 150 Emails (max)
Drop us a note on Replyify.com and let us know you followed the steps because we have a special surprise waiting.
Cheers!