
Cold Emailer’s Guide To Email Deliverability [2023]
tl;dr – there is no silver bullet for getting your emails out of the spam/promotions folder and into the primary inbox. An SEO expert will give you a similar answer when asked about how to rank on page 1 of Google. There is always a process involved and we’ll cover the email deliverability process in this (detailed) post.
To be successful with cold emailing, You need to make sure your emails get to the primary inbox and avoid spam or the promotions folder. The reputation of your domain and your email server IP address has a significant impact on your deliverability.
Mail servers use complicated algorithms that analyze data points like engagement, complaints, subdomain and top domain, bounces, DKIM, SPF, DMARC, IP address, email body content, branding, source code, etc. Many of the major email providers use these technologies to help reduce spam.
Email Setup Basics: Engineering Degree NOT Required
You don’t need to have an engineering degree to set up and manage your email account(s), but some technical know how goes a long way.

How to Set up Your Email Server
In order to receive email to the email address you are sending from, your sending domain name needs a mailbox attached to the domain name. This mailbox can be provided from your hosting provider or you can add a 3rd party provider like, Google Apps, Microsoft, GoDaddy etc.
Once you’ve identified a receiving mail server, you’ll need to add MX record of the mailbox provider in order to start receiving emails. Please refer to your Email Service Provider (ESP) for their specific instructions on setting up your email account and editing DNS settings. We have a guide for this with screenshots of me setting up my DNS on a new email account in this post.
DNS:
Domain Name Servers (DNS) are servers located all over the world and they are equivalent to a phone book for the internet. Internet Protocol (IP) Addresses are translated by DNS to a domain name. It’s a lot easier to remember Replyify.com as opposed to a 12 digit IP address like 192.723.384.456. DNS makes this possible and is managed wherever you have your domain hosted.
DNS also has an impact on your Deliverability by giving confidence to the recipient’s mail server that you are who you say you are.
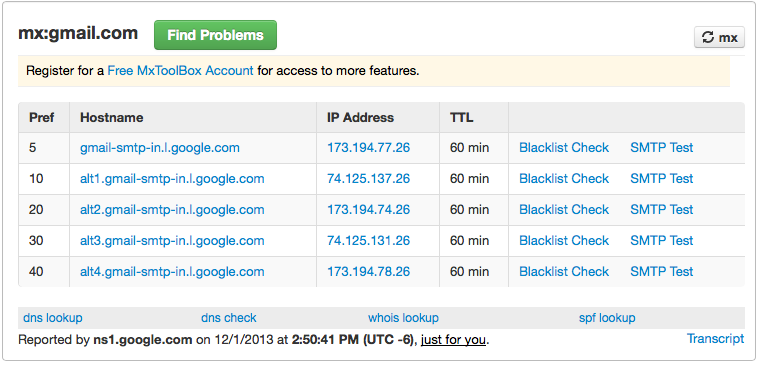
In order to send emails, your DNS has mail exchanger (MX) Records. An MX record is a verified resource record in the DNS that specifies a mail server responsible for accepting email messages on behalf of a recipient’s domain, and a preference value used to prioritize mail delivery if multiple mail servers are available.
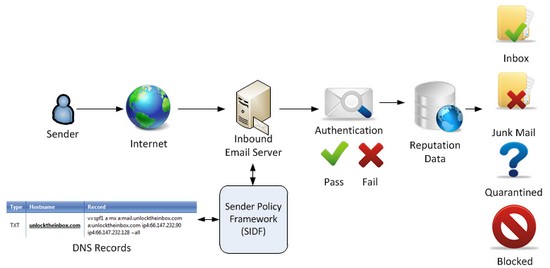
You can further help to reduce spam with just two records in your domain name system (DNS) settings: an SPF record and a DKIM record. These records improve email deliverability and reduce spam in slightly different ways, but both are equally important to set up in your DNS.
SPF (Sender Policy Framework):
A Sender Policy Framework (SPF) record indicates which mail servers are authorized to send mail for a domain. Your email recipient’s mail servers perform a check: “Is this email coming from an authorized mail server?” If not, then the email in question is more likely to be marked as spam. Your SPF DNS record lets the recipient’s email server perform this verification that your email comes from authorized servers.
DomainKeys Identified Mail (DKIM):
A DomainKeys Identified Mail (DKIM) record adds a digital signature to the emails your company sends. Email recipient servers perform a check: “Does the signature match?” If ‘yes’, then the email hasn’t been modified and is from a legitimate sender not someone trying to spoof your email. Your DKIM DNS record lets the recipient server perform this verification that the message is signed and associated with the correct domain.
DMARC (Domain-based Message Authentication Reporting and Conformance):
DMARC leverages both SPF and DKIM and represents the first step in generating visibility into email fraud threats. DMARC is a more complicated and advanced component of email authentication and helps your brand identify the phishing emails. It allows senders to work directly with mailbox providers to quarantine or reject any email that fails authentication. Even if you skip the DMARC setup, you MUST have an SPF record.
This may be a good time to bring in your ‘tech person’ but it’s something you can manage with a little research on editing Resource Records that are permissible in the Zone Files of your DNS settings.
If you use Google Apps for email, you’ll need access to your DNS provider to add an SPF record. In most cases, you simply login and create a new TXT record with the value of:
v=spf1 include:_spf.google.com ~all
Google provides detailed instructions and we wrote a detailed post on this as well. *Be sure to save your changes.*
Pro Tip: After you have made DNS update at your hosting provider and allowed the updates 24 to 48 to propagate, you can verify DNS settings with this site. You can also verify that SPF and DKIM are configured by sending an email from your Gmail account to check-auth@verifier.port25.com after you’ve completed the SPF and DKIM setup. You’ll receive an email response in a few minutes with a PASS or FAIL that everything is configured properly.
Managing Email Deliverability
If you are setting up a new email account READ THIS NOW. If optimizing an existing email account, make sure that you update the SPF and DKIM detailed above allowing 24-48 hours to propagate.
In this section, we’ll be talking through some of the key factors that can have a positive or negative affect and how to monitor, control and improve your email deliverability.
IP Server Reputation:
At Replyify, a lot of our clients use Gmail but you can integrate ANY email address on Replyify. Gmail is emerging as the go to email server for B2B companies who aren’t too heavily invested in a preexisting setup that would take weeks to rip and replace.
Get your G Suite account and set up your Gmail today by clicking here.
By default, Gmail (also referred to as Google Apps for Business) comes with an assigned IP address from Google. *This is NOT a permanent IP address* Gmail has a pool of IP addresses they rotate through. Because of Google’s strict attention to thwarting spammers, these IP addresses tied to your account tend to start off with a better than average reputation (but don’t forget to warm up the new email address…see below).
Your recipient’s spam filters will check the IP address to see if it’s white/black listed before even looking at the content of the email. If it is whitelisted, your email will be delivered without its content being checked at all. If your IP address is blacklisted, your email will most likely go to spam, which is why bulk/mass email delivery systems like Mailchimp don’t allow cold emails.
You can (and should) check your email server IP before you start sending cold emails and at regular intervals at least monthly. If you don’t have a dedicated IP address assigned by your mail server, you’ll be sending from an auto-assigned range of IP addresses.
- Go to your email account and send a few test emails to a few different (internal and external) email addresses that you have access to.
- Open the emails and inspect the headers. In Gmail, for example, open the email and click the ‘More’ option (three dots) then click show original. add image from desktop of this.
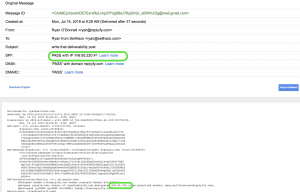
- The IP address will be listed in the top section and throughout the message headers. See the image below then go find a few of your IP Addresses.
- Time to test your IP addresses. There are a few free services out there that let you do this like:
– Mail-Tester and IsNotSpam to test the Spamminess of your Emails.
– GlockApps will help you identify potential filtering issues before you send.
– Mxtoolbox.com
– Blacklistalert.org
– Talos Intelligence - These assessments will relay a Good/Neutral/Poor score:
– Good Score: Congrats! Your emails are getting delivered to people who are engaging with you.
– Neutral Score: Check if there is anything you can do to optimize your reputation like adding a DKIM or DMARC record.
– Poor Score: The easiest solution would be to set up a new email address on an alternative domain or consider switching your email hosting provider. If your IP address is listed on any Blacklists, please visit each list and follow their respective delisting process. - Now that you have a more information about your IP reputation, you can take the necessary action to get any issues corrected. Remember: ALWAYS warm up your email when you make a core change to the email setup. Check out the section below about warming up an email address.
Domain Reputation:
The domain you use to send emails may or may not be the same domain your company’s website.
My email address is ryan [at] replyify.com. Replyify.com is my email domain and is also the primary domain for my company. Some companies like American Express have a primary domain (americanexpress.com) but a different email domain (aexp.com) and Southwest Airlines (southwest.com) also uses a different email domain (wnco.com).
Your email domain has a reputation, and this reputation is influenced by a lot of factors.
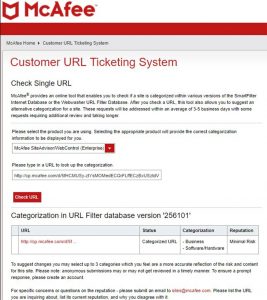
Domain Classification: Your domain classification can also impact your reputation whether it’s (e.g. business and industry, Computers and the Internet, education, finance or gambling). Cisco has a full description of the categories here. You can check your domain classification here and request an update from Mcafee.
Domain Age: Like a fine wine, the age of a domain can have an impact. For example, the first 5 days after a new domain is registered, it’s considered suspicious and you may have issues getting emails through to your recipients. You need to ‘warm up’ a new email domain. Here’s how…
Warming up a domain: Registering a new domain and expecting it to rank high is like a recent grad expecting an entry-level job making $100k a year. Your reputation should increase over time if you’re not a shady spammer. A good rule of thumb is to send a few emails per day, for the first 2-3 weeks after registration, to people that you know (but don’t share the same email domain). Ask them to reply back to you, then engage in a few back and forth conversations.
- Start to warm up your emails gradually so you don’t trigger any of the anti-spam providers prematurely. You can use the campaign settings on Replyify to manage and control the number of emails you send every day during the warm up period. Do this consistently for at least a week or two (longer the better).
- Slowly ramp up your volume over time (see example chart below)
- Send emails (ideally) to addresses hosted by different email service providers
- Change up the time of day you’re sending these emails to avoid looking like a bot
- Encourage the recipients to reply. Remember, engagement matters!
- Slowly ramp up your volume over time, sending emails at different times of day.
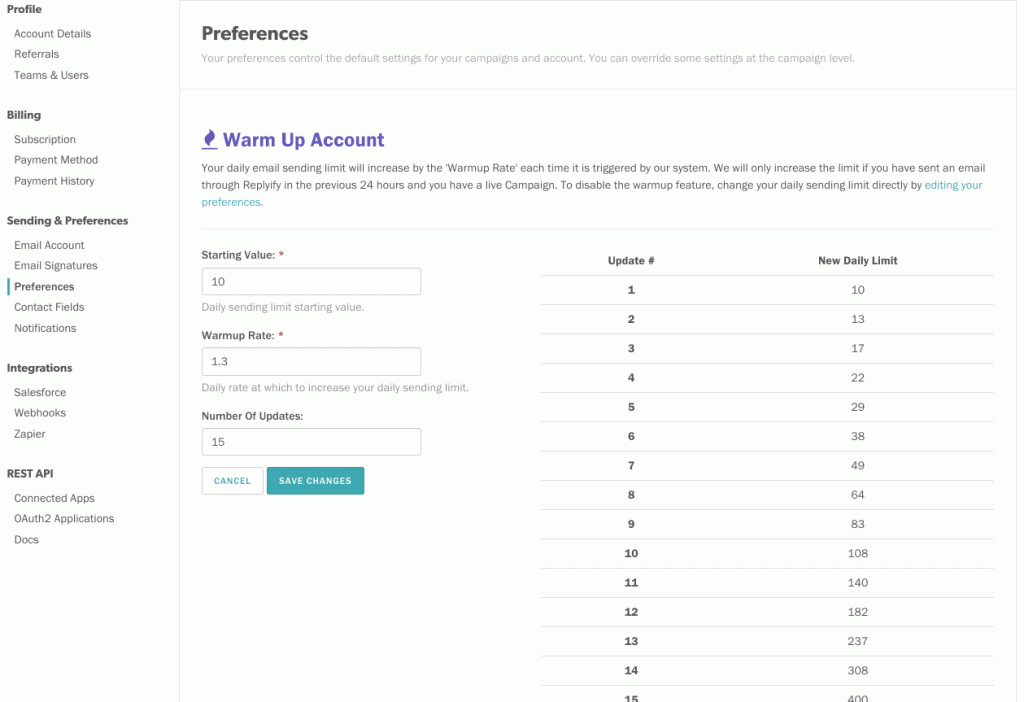
Pro Tip: Once your email setup is complete and verified by testing do not make any changes or you will be back in ‘warm up’ mode for the new configuration. Here’s a good 14 day email warm up to try on Replyify for your cold emailing. Make sure you use the ‘Warm Up Account’ button in your Replyify account preferences to automate this process of changing the daily sending limit.
Warming up your account is really important. Some email providers like Office 365 may limit your sending with “error 5.7.700-749 Access denied, tenant has exceeded threshold” because you came out of the gates to hot and triggered an automated abuse threshold. This post sums up what could happen.
Day 1: Send 5 Emails (max)
Day 2: Send 10 Emails (max)
Day 3: Send 15 Emails (max)
Day 4: Send 20 Emails (max)
Day 5: Send 25 Emails (max)
Day 6: Send 30 Emails (max)
Day 7: Send 40 Emails (max)
Day 8: Send 50 Emails (max)
Day 9: Send 60 Emails (max)
Day 10: Send 75 Emails (max)
Day 11: Send 90 Emails (max)
Day 12: Send 100 Emails (max)
Day 13: Send 125 Emails (max)
Day 14: Send 150 Emails (max)
Even after your domain is warmed up, don’t get to excited over that new 5,000+ list of prospects you got emails for on SellHack after finding a conference attendee list. Use Replyify’s ‘daily max contacts activated’ setting on the campaign to email a reasonable number of prospects so as not to spike your sending volume which could be the start to decreasing your sender reputation score.
Verify for daily sending limits from your email provider. Google Apps for Business Limits for example are 2,000 external email addresses. 2,000 sounds like a lot, but in practice these limits may skew more towards 1,000 per day. Remember, don’t try to get greedy by turning your awesome new B2B sales process in to a spam machine.
Pro Tip: Pay Google $5 a month if you’re using them to send emails. This means NO TRIAL ACCOUNTS and if you’re one of the cool kids who created a GSuite account ~2011 and are grandfathered in to still getting your email for FREE, you need to upgrade this before you start sending cold emails. Trial and Free accounts only get 500 total emails per day and are quick to get blocked. Here’s a step by step guide for creating a new email address specifically for cold emails. PS – even if you paid google $5 to set up your new account, your account will be considered a ‘Trial Account’ until you spend at least $30. Contact us to learn how to accelerate this process team@replyify.com.
Optimizing your Email Deliverability:
Engagement is a key factor in your reputation, but it isn’t easily quantifiable. Engagement is measured by a mail server based on a user’s interactions with an email (replies, opens, clicks, classification). Contacts engaging with your emails has a positive impact on your reputation. Emails read, Emails deleted without reading, Spam complaints, “This is not spam” notifications, Email replies, Emails that are “starred”. Other engagement events include: how many times messages are forwarded, how often messages are ignored, how often messages are deleted without being read, how often a sender is added to a contact book, and how often a message is moved from one folder to another.
Your ESP knows that there are always going to be folks you email who hate cold emails, love to report spam, or just having a bad day. It’s all about engagement and having a consistent process building quality prospect lists, writing personalized emails, consistently following-up, and engaging in a conversation with your prospects.
Did you know… according to Sendgrid, “Spam complaint rates above 0.2% are considered high, and may result in poor deliverability. At other inbox providers, like Gmail, a spam rate as low as .08% can start to affect your deliverability, which is why you need to keep a close eye on it.”

Pro Tip: Remember that automatic email filtering to the ‘Promotions’ tab or SPAM is done on the individual user level not the sender level. So, if you’re sending yourself test emails and wondering why they are going to the spam folder, you’re not looking at the whole picture. An email that goes to promotions for one person, may not for another.
If you’ve followed along you’re still having issues getting your emails to the primary inbox, try the following:
- Use a dedicated IP address or change your ESP to establish new IPs.
- Personalize your emails using variables like the recipient’s first name.
- Limit your use of HTML. Keep your emails clutter free an primarily text based. If you must use HTML, make sure all tags are closed, written in lowercase, and properly formatted.
- Be concise and get right to the point. Write your emails like they are getting sent to someone you already know.
- Be original with your email copy. Spam checkers are now fingerprinting which is a method to track sections and themes within emails instead of focusing on specific, individual words. A fingerprint is a small (64 bit) hash made from a part or all of the message content. Fingerprints can be made from any and every part of the email: header, footer, time stamp, subject, body text, images, images-to-text ratios, URLs, and even text color. Each fingerprint is then compared to other similar fingerprints. If your email fingerprint matches (or is very similar to) other fingerprints that were determined to be spam, then your email will be marked as spam, too.
- Keep a 60/40 text to image ratio or better yet, avoid images. Gmail (and other email providers) view images as a signal of a promotion or spam message. You will increase your deliverability by skipping the images.
- Don’t promote or sell too aggressively. Steer clear of a subject line: Hey!!!WANT TO GET MORE LEADS TODAY!!!
- Use the best cold email automation built for the highest deliverability.
- Spam trigger words to avoid like ‘free’, ‘credit’, ‘pharmacy’, ‘urgent’ ‘click here’ or excessive punctuation. You can find the full list of spam triggers here.
- Limiting links is the best way to keep an email from looking like a promotion is to have no more than 1 link per message. ps – this does not include information in your signature, like a phone number or email address, which may be hyperlinked by the email client your prospect is using to view the message.
- Limit attachments or better yet, serve your attachments by linking to them rather than attaching to the message directly.
- Creating a separate domain and email address ONLY for cold emails (read this post). There’s a school of thought that you should have a separate domain for your outbound cold emails. Some companies will also set up a different domain for transactional and even marketing emails for opt-ins. Depending on your sending volume or email content, a new domain may be a good option for you. Just remember to warm it up before you start expecting to see engagement results that you’ve been used to on your original email domain. Your domain name should always be linked to an existing website to gain the trust of the ISP’s.
- Pro Tip – Consider using a custom Domain/URL for click/open tracking. Read more in our Help Section
Testing Your Emails For Spam Content
Staying on top of your deliverability is not different than going to the doctor for regular checkups. It can be annoying or distracting, but it’s better than getting an email from your boss asking why meetings booked are down 30% from last month.
You can get your email scanned by major spam filters to see where issues may lie and how to fix them to improve your deliverability. Test and Optimize your Emails for the Inbox with these links to detect and fix potential delivery issues. Here are the most common spam filters to monitor:
- SpamAssassin – Open source most popular option for IT.
- Cloudmark – Watches 12% of the world’s inboxes.
- Barracuda – Real-time database of IP addresses that have a “poor” reputation
- Spamhaus PBL – includes dynamic and non mail server IP ranges and domain lookups
- AbuseAt – includes emails sent to spam traps or reported by their users as spam
The best way to get your IP out of the blacklist is to follow the process for the site that lists you as blacklisted. For example, if Google has you on a blacklist, fill out the form on this page. The better way to get your IP off of blacklists is to follow the steps we outlined in this post.
Happy Sending!
ps – have anything to add to this? drop us a note to team@replyify.com